Optimized Cooking: The Big Breakfast


breakfast

Another recipe/method optimized for equipment/time.

Equipment:

  • 1 Non-stick skillet
  • 1 knife (dinner knife)
  • 1 spatula
  • 1 small glass bowl
  • 1 fork
  • 1 piece clear plastic wrap

Ingredients:

  • 2 eggs
  • 2 slices of bread
  • 1 cup frozen hash browns
  • 1 tube-style package of breakfast sausage
  • 1 stick butter (refrigerated)
  • salt & pepper

Method:

Put skillet on the stove with medium heat.

Cut one end of the sausage package and squeeze out a portion onto plastic wrap.  Fold wrap over sausage and press to flatten sausage to desired thickness.  Pull patty off wrap and place in skillet. (Repeat for additional patties) Use the same piece of plastic wrap to seal up the sausage package and return it to the refrigerator.

Pour frozen hash brown portion into the glass bowl.  Microwave at full power for 2 minutes.

While potatoes are microwaving, put 2 pieces of bread in a toaster but don’t start toasting yet.  Slice 3 pats of butter with the knife.

When microwaving is complete, flip sausage patties and move to one side in the skillet, add 1 pat of butter to the open side of skillet and put hot hash browns on the butter.  Press potatoes down with a spatula.

Get a serving plate and fork ready.  When sausage is cooked remove to plate and flip hash browns.

While hash browns finish, crack eggs into the same glass bowl used for potatoes and whisk with the fork. Start the toaster.

Remove potatoes to serving plate and pour eggs into skillet.  Move eggs around lightly with spatula.

Remove toast from toaster and place 1 pat of butter on each hot slice.

Transfer cooked eggs to a serving plate.

Spread warmed butter pat over toast with knife and add to plate.

Use salt and pepper as desired.

Comments:

Using the plastic wrap to both seal the sausage container and press patties is convenient and thrifty.  Microwaving the frozen hash browns greatly reduces the overall prep time. Using refrigerated butter and still being able to spread it depends on adding it onto the toast just out of the toaster.  The method also works well with over-easy eggs — they can be cooked along side the hash browns in the same skillet after the sausage has been removed.  The fork and knife used in prep can be used for eating (you can rinse them first if you prefer). There’s very little standing around time in this method.


Optimum Cooking: The Grilled Cheese Sandwich

Gcs
An optimized recipe/time and equipment
Equipment:
1 pan
1 knife (dinner knife)
1 fork
Ingredients:
2 bread slices
Cheese Spread (eg. Kraft Cheese Whiz)
Stick of butter (refrigerated)
Method:
Preheat pan on medium heat.
Use knife to cut two pats of butter.
Use knife to spread cheese spread on one slice of bread & add other slice on top.
Put one pat of butter in pan to melt.
Put cheese sandwich on melted butter and move around a little.
Wait for one side to brown (lift and check with fork).
Lift sandwich out of pan with fork and add last pat of butter.
Flip sandwich onto melted butter and move around with fork.
Wait for second side to brown (lift and check with fork).
Remove sandwich with fork.
Comments:
Refrigerated butter is too hard to spread on bread.  This method avoids spreading butter.  The same knife can be used for the cheese spread without contaminating the spread with butter because the butter stick is firm and doesn’t leave butter on the knife.  The fork could be replaced with a spatula, but if you have pickle(s) with the sandwich you can use the fork first to spear pickles from the jar onto your plate before you use it in cooking.  The pan is warming up while you prepare the sandwich to save time. Use the knife to slice the sandwich, if desired.

SVG Tarot Card Resource

I’ve prepared a full deck of tarot card faces which should be useful for programmers.  It includes card face files for the four suits (clubs, diamonds, hearts and spades) with 14 cards per suit.  The court cards include the Jack, Knight, Queen and King.  The 22 Major arcana trumps are also included.  All of the files are individual files per card in SVG format, so they are scalable without pixelation and can be edited in a vector drawing program.  The picture below shows examples of a few card faces.

Example Card Faces
Example Card Faces

The card face files are all included in this 7zip archive.

Calibre Companion on Kindle Fire HD

cciu

Calibre Companion (CC) is an android app that can be used with the Calibre book library program on your PC.  The app provides for:

  • wireless transfers of books from PC to android device,
  • indexing of books by author, title, tags or other metadata,
  • comprehensive book metadata synced between devices and
  • cover or list browsing for books.

The app requires that the main Calibre program be running on your computer in order to do wireless transfers or sync metadata.  Also, metadata and tags can only be edited in the main Calibre program (not on your android device).  The CC app is available in the Amazon App Store for $2.99.

Screenshot_2014-05-26-15-14-53

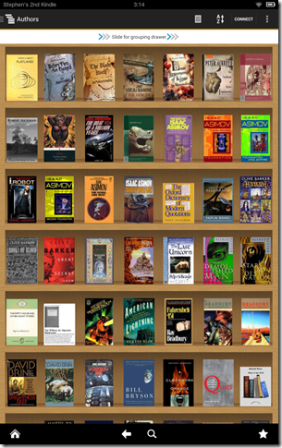
The screenshot at the left shows the main browsing window of the app running on my Kindle Fire HD 8.9 (1st gen), with the books sorted by author.

Tap a book cover and the screen changes to show the book and metadata page.

Long-press a book cover and the app opens a reader app on the Kindle Fire HD to read the book.

The first time you select to read a book it will ask what reader app you want and does include the native Kindle reader app as a choice.


Screenshot_2014-05-26-15-18-39


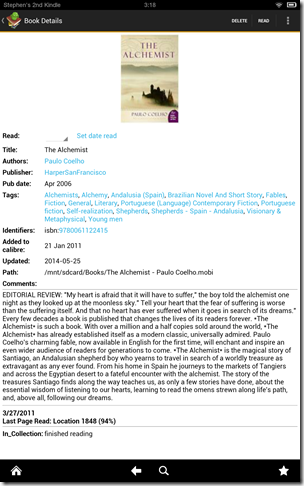
This screen shows the book details view.  The command bar at the top changes to let you “Read” or “Delete” this book from this page.


Screenshot_2014-05-26-15-14-26

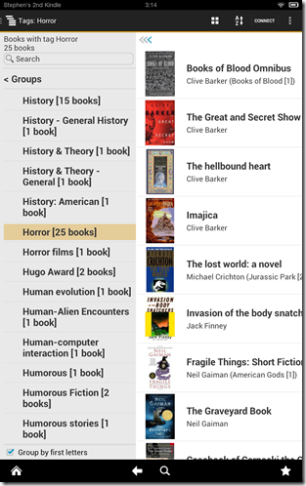
A book “List” view with the grouping slider pane open, shows how to use tags to filter the display of books in the library.  This is a very handy feature if you have a large library of books.


You can do a wireless book transfer as follows.  In the CC app go to Settings>>Wireless Device Connection.  I have IP address and port set to “Automatic” and it works with my home Wi-Fi.

However, it didn’t work the first time I tried to connect from Calibre on my PC.  Eventually, I realized my firewall was blocking Calibre from making the connection.  In my firewall program I had to find Calibre.exe, which was listed as “The main Calibre program” in the “T” portion of the list, not in the “C’s” where I expected it.  Once I set it to “Allowed” all worked as advertised.

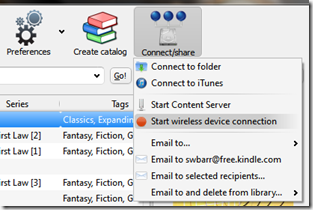
CMenuInside Calibre on my computer, I added the “Connect/share” choice to the main toolbar.  Now I can use it to “Start a wireless device connection” and press the “Connect” button in the CC app running on the Kindle Fire HD.  If it’s successful the Kindle shows up as an active device in Calibre and I can use the regular “Send to Device” commands to send books or see books on the Kindle without a wired connection.  This feature and the library off-line sorting and browsing make the Calibre Companion app worth the money.

Setting Up Your New KINDLE FIRE HD

First Steps (wireless & e-mail)

First setup your wireless connection on the Kindle.  On the home screen (tap the little house icon at bottom left to go there) swipe your finger down from the top of the screen to reveal the settings page.  Tap Wireless and a list of wireless networks around you will be shown. 1 Tap your network in the list, enter the Wi-Fi network password and tap Connect.

Next setup your e-mail accounts.  Tap the Home  icon and swipe down from the top again to get the Settings screen.  If you don’t see a heading of “Settings” followed by a list, tap the More icon which looks like a plus sign inside a white circle.  Tap My Account.  Tap Manage E-mail, Contacts, Calendars. Tap Add Account and choose your email provider from the next screen.  Enter your e-mail address and password using the on-screen keyboard.2  Add more accounts if you have them. 
kindlefirehd1 The Kindle Wireless setting must be “ON” — if you have a hidden network that’s not shown in the list, (you chose to not broadcast the network SSID from your router) then you need to choose the Add Network + choice and enter a network ID and password.

2  If you need capital letters tap the “up arrow” key to shift.  For numbers and symbols tap the “?123” key (tap the “ABC” key to go back to letters).  Tap the “Next” button to go to the next field in the entry form.

Tip: If you are ever on a screen where the home icon is hidden, you can get it back by a single tap at the bottom center of the screen.
Amazon Prime

You get one month of the Amazon Prime service for free when you registered your Kindle Fire HD.  This entitles you to free 2-day shipping from amazon.com and several other services.  After a month you’ll have to decide if you want to pay for an annual subscription.

amazonprimeYou can “Shop” on amazon.com for Amazon Instant Video (shown as a Prime Instant Video) and stream them to your Kindle Fire HD for free.  If you have a Roku media streamer or smart TV you can use its Amazon Instant Video app to stream movies and TV shows to your home theater.1 You can “buy” one free “qualifying (Amazon.com Prime)” e-book per month as part of the service.  There is also a Kindle Owners Lending Library where you can borrow a book for 30 days.  For simplicity, “Amazon Prime” is a separate shopping category on the amazon.com site.

1 An alternative is to buy a mini-HDMI to HDMI cable to plug your Kindle Fire HD into your TV’s HMDI port to watch and listen to your content on the home theater system.

Tip: If you do nothing else, get your free e-book before this offer expires.


Apps for Kindle Fire HD

There are already apps on your device and they are worth checking out.  You already setup the e-mail app and if you went to the Amazon store you were using the Shop Amazon app.  The Amazon AppStore for Android has thousands of paid and free apps that will work fine on your device.  And it offers one (normally paid app) for free each day.

appsBut first, a warning.  Some Amazon apps on the site look to be things you’d want on your Kindle Fire HD (for instance, the Kindle Reader and Kindle AppStore apps) but these are already built-in to your device.  They are offered in the store for users of Android phones or tablets which don’t have them built-in.  Also, lamentably, many free apps are so riddled with ads and offers for paid upgrades that they are unusable.  It’s OK to try them for a while then uninstall them1 when you can’t stand them anymore. 

And finally, many (most?) of the apps are designed for smart phones and their display doesn’t take advantage of the screen on an HD tablet.  Look for apps that have “HD” in the name or say “for Kindle Fire”.  Read some of the user comments and see if it’s worked well on the Kindle Fire HD.  It’s still not a foolproof method, but it improves your chances of actually liking the app.

1 To uninstall an app:  from the home screen tap Apps on the header bar.  On the Apps screen tap the “Device” button at the top center.  Scroll to find the app to uninstall.  Long-press the app icon and tap “Remove from Device” in the pop-up menu.  You may have to confirm this action.

Tip:  When you purchase an app on the store it is sent wirelessly to your Kindle, so be sure you have wireless turned on to receive the app.


Recommended Free Apps
  1. Your local TV news station (search the AppStore for “tv news”)
  2. ES File Explorer (manage & play files on your device or network)
  3. DuckDuckGo Search (a Google alternative that saves nothing about you)
  4. Evernote (organizes and creates notes and reminders)
  5. Mahjong Deluxe HD Free (game)
  6. NeoCal Lite Calculator (scientific calculator with history list)
  7. News Republic (a news aggregator with pictures)
  8. Avia Media Player (play media and can send to a media renderer wirelessly)
  9. Sudoku Free (game, set your difficulty – tiny ads)
  10.  The Weather Channel for Android (local weather, maps, videos – fast)
Other Apps

Explore what you can get that lets your Kindle interact with your services at home.  For instance if you are a Netflix subscriber try the Netflix app.  I have apps that interact with my media streaming box and an app that interacts with my PC music studio.  You may find an app that lets you use your Kindle as a remote control.  One of the apps that comes pre-installed on the Kindle Fire HD is Skype.  Microsoft recently bought Skype as a replacement for Microsoft Messenger.  Text messages and video calls are free for Skype-to-Skype messaging.

Other Considerations

Your device is Bluetooth-capable so you can use a Bluetooth wireless keyboard with it.1  Hard plastic covers are available which offer some protection.  Some apps (like drawing/sketching, crossword games) work a lot easier if you use a stylus designed for touch screens.  If you have media you want to transfer to your device from your PC or network you can either hook it up with the USB cable (and copy mp3 music files to the Kindle music folder, for example) or you could use the ES File Explorer app to wirelessly transfer files from public network sources.

There is a lot more you can do to customize your experience in the Settings, but I leave that for you to discover.

1 There is a Bluetooth setup in the Settings list.

Syncing ‘Last Page Read’ on Kindles for non-Amazon Books

If you buy an e-book from the Amazon.com store and send it to multiple reading devices, chances are good that they will remember the last page read for that book between devices.  This feature (sometimes referred to as “syncing”) doesn’t work if you “sideload” (directly copy a file from another device) a non-Amazon book.  For instance, if I copy an e-book file from my computer to both my Kindle Keyboard and my Kindle Fire HD via the USB cable that book will not remember the last page read between those Kindles.  So what is the solution?  I know two ways to make this work.

Send to Kindle for PC

The first is using the “Send to Kindle” program provided by Amazon.  You can download the program Send to Kindle for PC from the Amazon.com site.  Once it is installed, and you register with your Amazon.com account information, it can be called up by right-clicking a file (formats: DOC, DOCX, TXT, RTF, JPEG, GIF, PNG, BMP, PDF or MOBI) on your PC.

S2K1

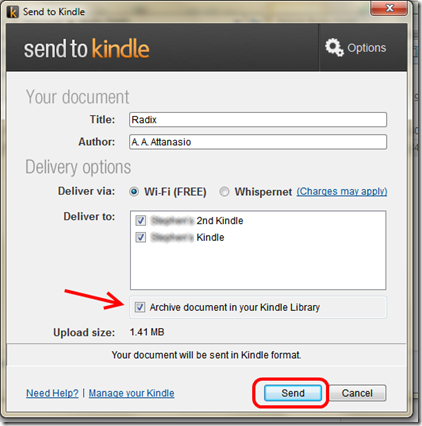
Choose which devices to send to and be sure that the “Archive documents..” box is checked.  Once this window is opened you can also drag-and-drop multiple files on it.  “Send to Kindle” will also appear as a new printer in your Print menu, but if you choose this option it will always send a PDF document to your device(s).

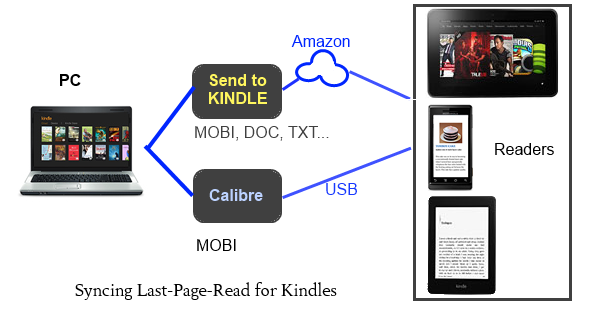
To specifically use this to sync last page read on your books they need to be in one of the acceptable formats (MOBI, for example, will work fine).  Just use the program to send a MOBI-formatted book file to your devices with the “Archive document in your Kindle Library” box checked.  As a pop-up says, it may take several minutes for it to be delivered by Wi-Fi.

Calibre

The other way to sync your e-books is to use the Calibre e-book management program on your PC to convert your file to MOBI format.  Even if you obtained the file already in MOBI format, use Calibre to re-convert it before sending to your devices.  Also, if you are a long-time Calibre user and converted your files with a version of Calibre prior to 7.44 you need to re-convert those files with a newer version of Calibre.

To get the e-books to sync using Calibre just send the MOBI format file to your devices through a USB cable.

S2K2

Summary

Both methods require installing and using a PC application.  With “Send to Kindle” you don’t need to hook your devices to your PC with a USB cable and you can sync more formats.  However, the books do pass through the Amazon cloud server.  With Calibre, only the MOBI format will sync properly and the files are transferred directly to the devices via cable — by-passing Amazon.com entirely.


Unexpected Benefits of a Network Media Player

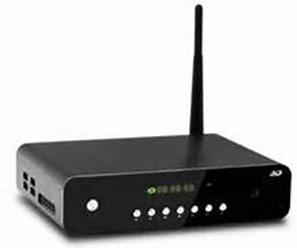
I have a Kdlinks HD700 Network Media Player, but the model doesn’t matter much in this context as long as it is DLNA (Digital Living Network Alliance) certified (with digital media renderer).  DLNA devices on your home network can use each other for media sources or as media players.

th

The primary function of my HD700 is to play media files from my network storage drive to my home theater, so I have full-time access to music and movie files without leaving any computer turned on.  So I can get my movies and music onto my home theater system, laptop or Kindle Fire HD over a wired and wireless network connection.  That’s why I bought it and it does the job well.  But over months of use, I have discovered some unexpected benefits related to using it as a DLNA device.

From Networked Computers

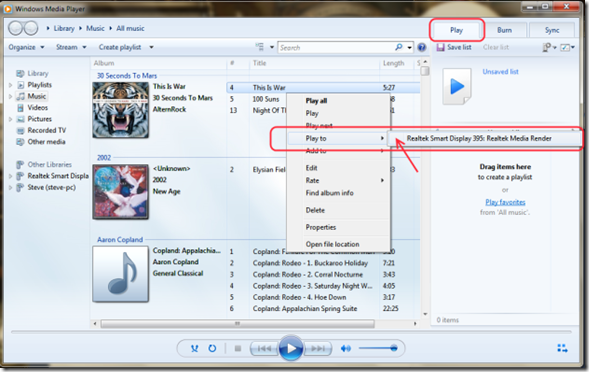
In Windows Media Player 12, networked DLNA devices can be used as an output destination.  Just right-click a media file name in WMP12 and choose the “Play To..” option to start playing on your network player (In this case my home theater system).

PlayTo1

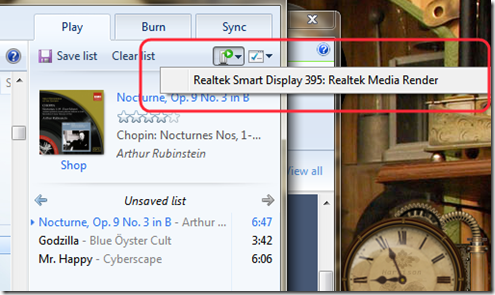
Or create a playlist in WMP 12 and choose the little “Play to device” icon to start playing to your device.  This is a great feature for my use, since the HD700 isn’t very agile at making playlists on-the-fly.

PlayTo2

See how it referred to my device as a “Media Renderer”?  That’s the key.  If your network player has a compatible media renderer you’ll be able to set this up.

Apps From the Kindle Fire HD (or other Android device)

Two come to mind here, Skifta and Twonky Beam.  Both are free at the Amazon App Store.

SkiftaoneSkifta lets you connect a network media source to a network media renderer from the Kindle Fire screen.  The sources (in my case) include the files on the Kindle Fire HD, files from network computers (that are turned on), online files (like at DropBox) and files from my network storage.  Then I can choose my HD700 (Realtek Media Renderer) as the player.  This set up allows me to control the media through the Kindle screen, which is convenient.  You can also install a desktop version to allow you to use your computer as a player destination.

twonkyTwonky Beam lets you send streaming media from selected internet sources to your media player device.  It only works through a few select web sites, but does include YouTube.  When viewing an internet video on the Kindle Fire HD using Twonky, a “Beam” button appears.  Click “Beam” and the video starts playing on your selected destination device.  This makes it easy to watch some internet streams on the TV screen.

XBMC: Turn Your Laptop into a Media Center

So now that you have tablets to play around with, is your old laptop feeling neglected?  If it has an HDMI port* then it has the makings of a great media center PC to work with your home theater setup.

The general idea is to install software on the laptop that will organize your media files, stream internet content and play all this on your big screen TV with the best sound possible.

You will need one additional piece of hardware: a long HDMI cable.  Don’t spend a lot for one, wait for a sale.  I’ve seen 50-foot cables sell for under $20 on sale.

As for software you can go with Plex Media Server, or my preference would be XBMC Media Center. For now, let’s go with XBMC.

2_home-movies

Download and install XBMC on your laptop.  Since you are going to want the best audio possible you need to set up HDMI audio in Windows.  This requires an active HDMI connection so plug in your HDMI cable connecting your laptop to an input on your AV Receiver.   Turn on your Home Theater setup and select the HDMI connection you just made.  You should see your laptop display on the TV.

Open Windows Control Panel >> Sound>>Playback and select your HDMI output as the default device by selecting it and clicking the “Set default” button. Click “OK” to close Control Panel.

Note: Don’t worry, it will only be the default device when it’s “active”.  When no HDMI device is active you’ll default to your normal laptop sound.

Start XBMC and go to Settings

System>> Audio Output>>  
-Audio Output HDMI
-Speaker Configuration 5.1 (what your Home Theater uses)
-Dolby Digital (AC3) capable receiver (selected)
-Multi-channel LPCM capable receiver (selected)
-(DTS, True HD, only if your receiver can)  
Audio Output device DirectSound:HDMI…
Pass-through output device DirectSound:HDMI…
System>>Input Devices>>  
Enable mouse and touchscreen support (selected)

There are other settings you should make, but they are matters of personal preference.

The final step is to go back to the XBMC main menu, select each media category and choose “Add Source” to point to your media files on the laptop or on your home network.  You can find some useful help and new XBMC skins on the XBMC home page.

A final note.  With the settings you made in Control Panel anything you can watch or play on your laptop can be viewed on your TV with sound even without using XBMC.

* If you have a UPnP device as part of your Home Theater system, future versions of XBMC will be capable of “pushing” media wirelessly to that device.  So, no HDMI cable will be needed.

Steampunk Rainmeter Layout

I am a big fan of Rainmeter desktop customization.  I just finished putting together another Rainmeter desktop layout for my laptop computer. 

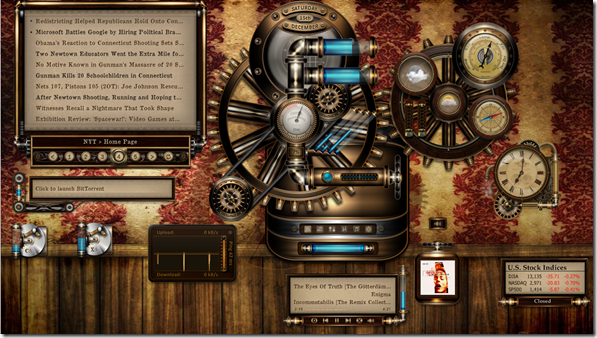
This one is based on steampunk themed (think lots of gears and brass) skins created by Customize.org member, Mordasius.  The majority of my layout is from the Big, Bold & Brassy collection of Rainmeter skins available for download from customize.org.  My laptop has a native resolution of 1366 x 768 and you can see in the screenshot that this makes for a tight fit. 

SteampunkDesktop

I added a different analog clock from another Mordasius skin (available here), which features animated gears with a piston that appears to vent steam every minute. 

I found the background “wallpaper & wainscoting” by searching for “steampunk backgrounds” with Bing.  And finally, I adapted my own stock market skin (lower right corner) to fit the theme.  You can read all about the features (e.g., WiFi, network, music player, RSS reader, etc. skins) at the customize.org link above.

Read EPUB Books on Kindle Fire Without Conversion

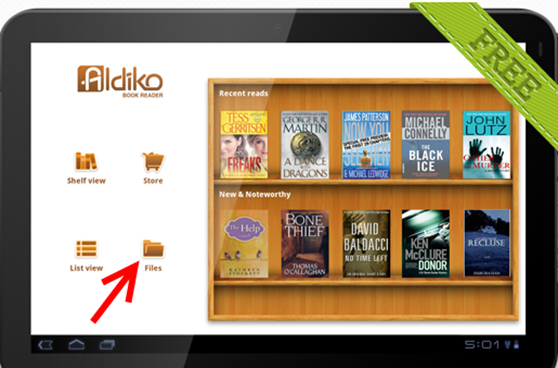
Yes, it is possible but will require “side-loading” the necessary app (Aldiko Book Reader Application).  Once loaded, the Aldiko app works perfectly on the Kindle Fire (HD).

Step 1 Change a system setting on the Kindle Fire

On your Kindle Fire use the pull-down settings menu, choose “More” then “Device” then turn on the “Allow Installation of Applications from Unknown Sources” option.

Step 2 Download the APK file

Download the application “apk” installation file.  The apk file can be downloaded directly from the source at the originators web site to your Kindle Fire.  Open the web browser on your Fire and type in “Aldiko”.  From the search results go to their Home page.  Go to “Support” from the green  menu bar.

Alkido1

On the Support page follow the first topic link (“Download the Latest…”).

Alkido2

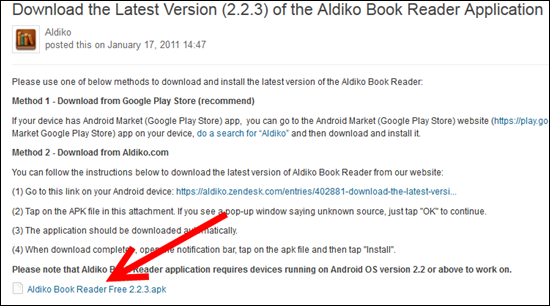
On the Download page click the apk file link (“Aldiko Book Reader Free 2.2.3.apk” at the bottom  of the page.

Alkido3

Download the file to a folder on your Kindle Fire.

Step 3 Install the APK package

Open a file manager app on your Kindle Fire, like ES File Explorer or Browser for SkyDrive (discussed in a previous posting and available from the Amazon App Store) and navigate to the folder where you put the apk file (usually “Downloads” by default).  Touch the file name to launch the installation of the app.

Step 4 Get Books

Aldiko has a built-in Store for buying epub books, or get books from any source and copy them to your Kindle Fire by WiFi or USB cable.  To add books to your Aldiko library use the “Files” widget on the main screen to specify epub files on your Kindle Fire.  It is also capable of aquiring  school and library books from the library’s “overdive” system without having to install a separate overdrive app.  Enjoy!

Aldiko4